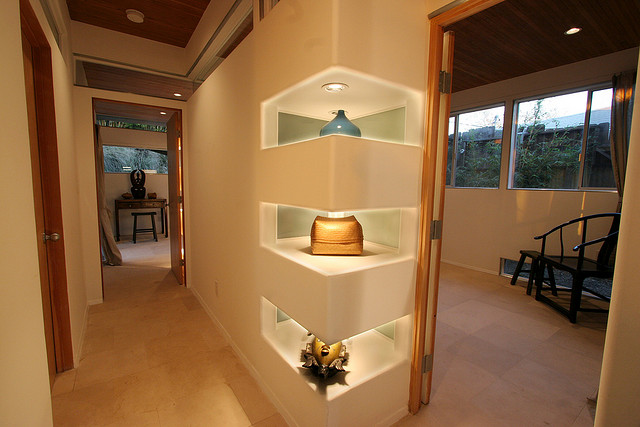
Recessed shelving is a great way to use your available space optimally, making it functional and serve you very well. Whether you want to mount it in the bathroom, living room or another room in your home, you need to consider some things and choose the location carefully. Try finding a wall, which hasn’t got pipes or wires in it, so you can have less work to do and less problems can occur. This ultimate guide will teach you how to plan and build recessed shelving on nearly every location.
If you create a partition wall, the plumbing in your bathroom can be hidden and this room will be improved and redesigned with a recessed shelving. The wall supports need to be placed on the proper locations and a piece of plywood can be used to create the front of your shelving. Behind the plywood you can insert some concealed lights, mirrors and accessories, styling your recessed shelving however you like. The following ultimate guide for planning and building a recessed shelving, can be used for almost every room to help you with your project. The final result will be a pricey-looking shelf space, which can be used for whatever purpose you decide.

The whole work will take you around four hours. In these four easy steps you can complete your work with planning and building the recessed shelving you need. The first step is to plan your project well. You should plan where you need the recessed spaces for shelves and mirrors to be located, using the holes in the partition wall. Use the plywood sheet, which will shape your wall, to draw the plan on it. You have to include in your plan the gaps for pipes, plumbing and electrical wires. These gaps will be used for fitting your plywood around them. A tin can serve you as a template to make the corners of the holes perfectly round.
The next step involves filling the gaps. Fill the space between the partition wall props and the solid wall with plywood pieces, which you have cut in advance. Four pieces of plywood will be necessary for each aperture to be filled on the bottom, top, left and right side. Now you can create the sides of your shelves by using the necessary instruments to screw the plywood to be steady on its place.

The next step includes cutting plywood facing. Make openings in your plywood board, using a jigsaw. Do this exactly as you have planned in the beginning of your work. If you need to make perfectly round holes for the toilet flush, use the necessary tools for this purpose. Always cut form this side of the plywood, which will be positioned towards the wall, so that all marks and drawings, done for planning your project, won’t be seen.
The final step of building your recessed shelving is making your plywood facing enough secure and steady. Place the plywood board on its proper position, adjust and set the screws in the plywood towards the braces of the partition wall. Use sandpaper to make the rims of the plywood dents even and smooth. Now you can use this recessed shelving for hanging lights, mirrors, different accessories and whatever objects you decide.
After creating this recessed shelving, you need to provide proper cleaning of the room, which you have used to work in, SparklingCarpets Kentish Town. Gather all waste materials, cleaning the dust and leftovers, which are scattered in the room. After cleaning your room and shelving, you can use your new possession to serve you for different purposes. Recessed shelving can be used in almost every room to store different items and make your room more tidy and stylish.